Installing an EV Charger? Avoid These 16 Common Mistakes
Last Updated: 13th Jul 2026 By Finn Peacock, Chartered Electrical Engineer. Fact-checked by Anthony Bennett, Licensed Electrician, Roofer & Solar Installer.
A home EV charger is probably the single most power-hungry appliance you’ll ever install. Get the installation right, and it should quietly charge your car for years. Get it wrong, and you can end up with nuisance tripping, unreliable smart charging, poor solar integration, a drained home battery, or a much bigger bill than expected.
This guide explains the common EV charger installation mistakes to avoid, including cabling, internet connectivity, solar integration, home batteries, isolator switches, cable sizing and future upgrades.
- Assuming Any Old Circuit Will Do
- Not Installing 3-Phase If You Can
- Choosing The Charger Location Before Checking The Cable Route
- Forgetting About Switchboard Space
- Not Future-Proofing A Switchboard Upgrade
- Relying On Weak Wi-Fi
- Forgetting That Cloud-Controlled Charging Needs A Reliable Network
- Assuming Solar Smart Charging Just Works
- Forgetting The Extra Data Cables Or CTs For Solar Charging
- Letting Your EV Drain Your Home Battery
- Leaving Battery Integration To The Installer On The Day
- Letting The Wrong Person Move Your CT Coils
- Making The Charger Hard To Isolate Or Reset
- Undersizing The Charging Circuit
- Not Future-Proofing Expensive Cable Runs
- Ignoring Your Grid Connection Limits
Mistake #1: Assuming Any Old Circuit Will Do
You can’t treat an EV charger like a normal appliance tacked onto an existing circuit. EV charging is a big, sustained load that might use half of all the power available from the street, so the circuit needs to be designed for that job from the start.
An EV charger needs a dedicated circuit from your main switchboard (or the nearest suitable sub-board). This will be a single-phase or three-phase cable, depending on your home supply and the charger you’re installing.
It’s worth remembering if you have solar & battery in a garage, a large sub board can simplify wiring, reduce losses and save money on main switchboard works.
Mistake #2: Not Installing 3-Phase If You Can
If you have a 3-phase supply, we strongly recommend installing a 3-phase charger. The faster charging speed is worth it, especially in the future when many homes will need to charge more than one EV.
A 3-phase installation may add a few hundred dollars compared to single-phase. But upgrading later can cost thousands. That’s a painful way to save money.
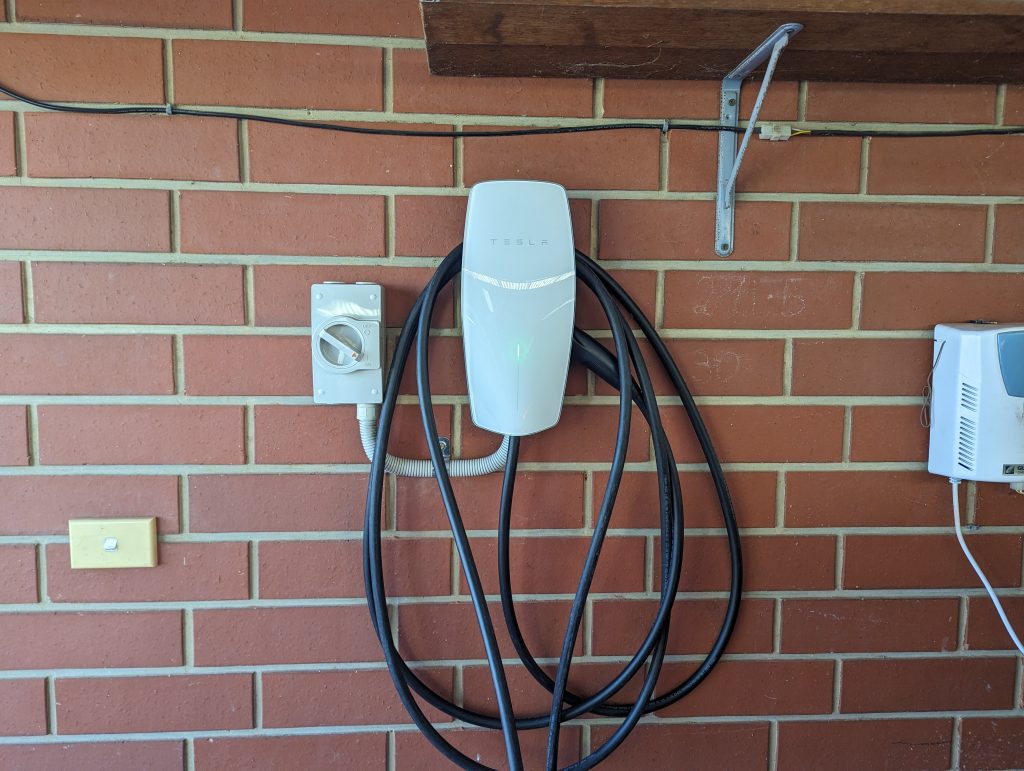
Mistake #3: Choosing The Charger Location Without Checking The Cable Route
The difficulty and cost of the cable run depend on where your EV charger is compared to your switchboard.
Don’t pick a charger location because it looks convenient without checking how hard it will be to get cable there. A charger close to the switchboard on a garage wall can be straightforward. A charger on the other side of the house can mean a long, fiddly run through walls, roofs, roof cavities, conduit, brickwork or even trenching.
Remember the charger lead from the wall to your car needs to be long enough too.
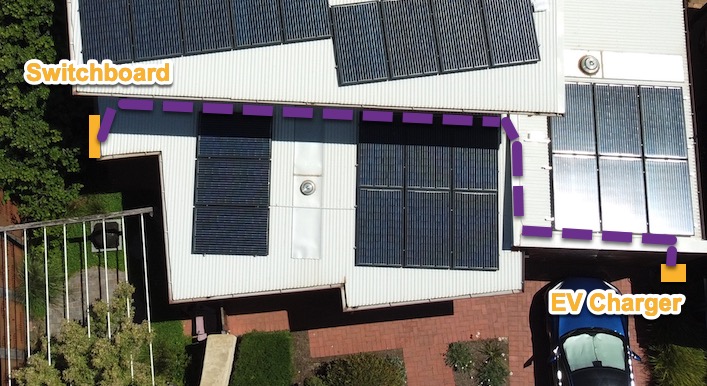
Below is a photo of my roof. The cable run from the switchboard to my EV charger goes up a wall, through the roof, and then along two different roofs. The cathedral ceilings prevented my installer from going through a roof cavity. Then it goes back through the roof and down a brick wall.
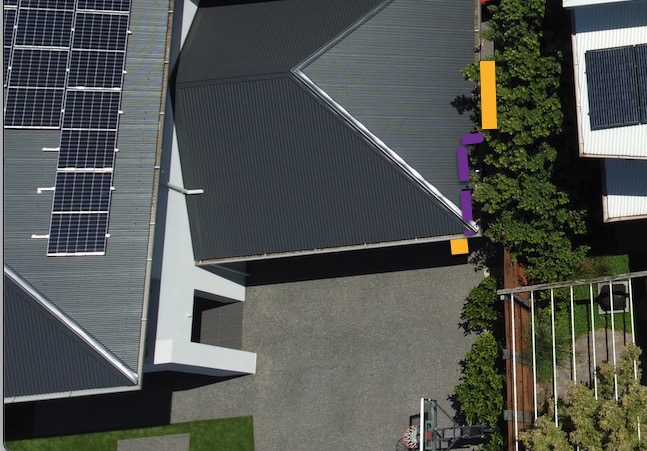
Compare that to my neighbour. His switchboard is on his garage wall, with an easy run to an EV charger on the front of his garage:
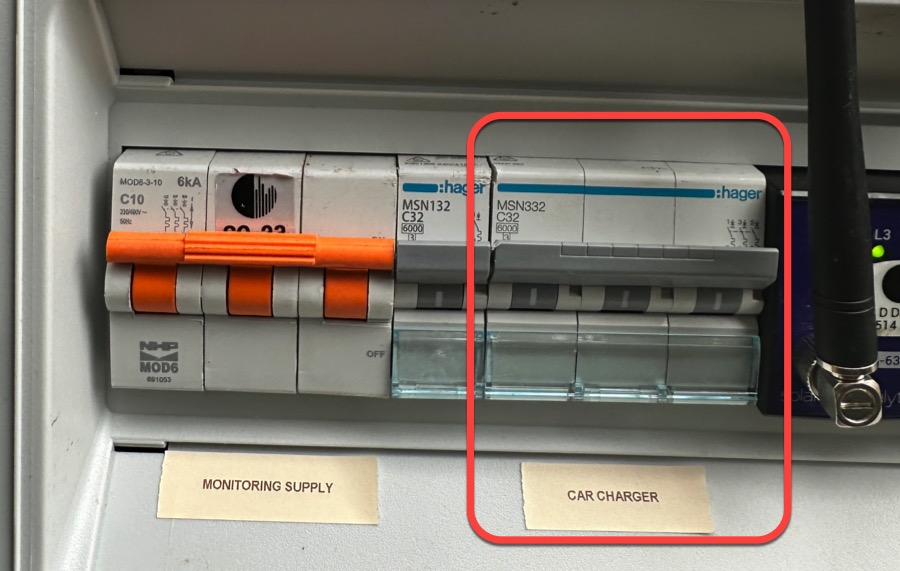
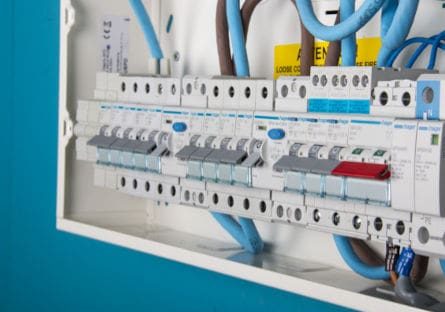
Mistake #4: Forgetting About Switchboard Space
Your EV charger will need space in the switchboard for its own breaker. If your switchboard is full, you may need a switchboard upgrade, which can add a lot to the installation cost.
A 3-phase EV charger also needs a 3-phase breaker, which takes up three times the rail space of a single-phase breaker.
Mistake #5: Not Future-Proofing A Switchboard Upgrade
If you do need a switchboard upgrade or an additional sub-board, don’t squeeze everything into the smallest board that technically works today.
Bigger is better. Try to get double the rail space for circuit breakers. It may feel like overkill now, but future you may want more solar, a battery, another EV charger, induction cooking, heat pump hot water or electric heating.
Mistake #6: Relying On Weak Wi-Fi
Smart EV chargers need an internet connection for monitoring and/or control. The poles & wires people also have some rules requiring an internet connection.
The mistake is assuming “there’s Wi-Fi in the house” means “the charger will be fine”. It may not be. Garages, driveways and carports are often terrible places for Wi-Fi reception.
A hard-wired data connection is better than Wi-Fi because it’s more reliable, and there is no Wi-Fi password to worry about later.
One of the biggest call-outs for solar, battery and EV charger installers is changing the Wi-Fi password in devices they installed after the homeowner gets a new router. A hard-wired connection avoids that nonsense.
Mistake #7: Forgetting That Cloud-Controlled Charging Needs A Reliable Network
If you use a cloud service such as Amber or Charge HQ to control your charging, a robust network connection is even more important.
Paying for smart charging only to give the charger a flaky internet connection is a bad idea. If the charger loses its network connection, it may stop charging or degrade into a dumb charger with none of the smart control you paid for.
Mistake #8: Assuming Solar Smart Charging Just Works
If your EV charger has smart-solar charging, it needs to know how much spare solar is available to charge with at any moment.
Solar-aware charging doesn’t just happen automatically. The charger needs a way to measure or receive that information.
There are five ways it may do this:
- With a Current Transformer (CT), which clips around the incoming mains cable and measures the current going into the street. That exported current is your excess solar.
- With a wired connection to a mini smart meter in your switchboard that measures the correct current.
- With a wireless connection to a mini smart meter in your switchboard.
- Across your home network.
- Across the cloud with an app such as Charge HQ.
Mistake #9: Forgetting The Extra Data Cables Or CTs For Solar Charging
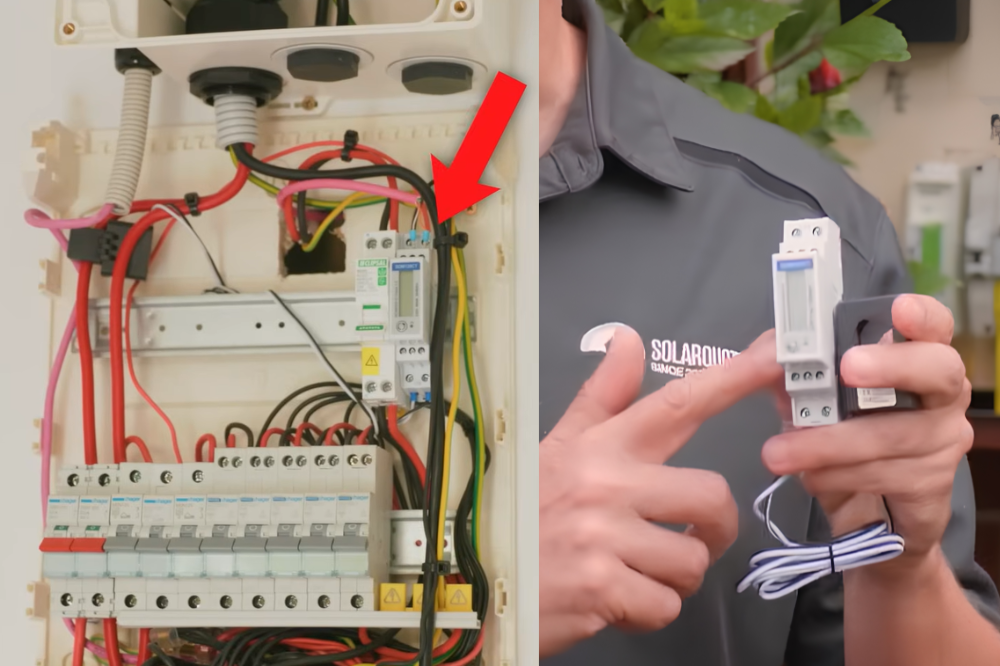
A small energy meter and CT clamp used to measure power flow in the switchboard. Smart solar EV charging depends on these being installed in the right place and wired correctly.
Don’t leave the solar-tracking method until the end of the job. Some approaches need extra hardware and cabling.
Options 1 and 2 require a dedicated data cable to the CT or smart meter in the main switchboard. A 3-phase smart charger will require three CTs.
Make sure your installer knows exactly how the charger will measure spare solar before they quote, not after they arrive.
Mistake #10: Letting Your EV Drain Your Home Battery
If you have a home battery, don’t assume your EV charger and battery will politely stay out of each other’s way.
The mistake is doing nothing, then discovering your home battery empties itself into your car battery whenever the car is charging and there isn’t enough solar.
There are three ways to integrate an EV charger with a home battery:
- Do nothing. Your home battery will empty into your car battery when your car is charging and there’s not enough solar.
- Use an EV charger that can talk to and control your battery. Unless your EV charger is the same brand as your home battery, this is unlikely.
- Hardwire your EV charger to be invisible to the battery, so your home battery can’t ever discharge into your EV.
Mistake #11: Leaving Battery Integration To The Installer On The Day
Don’t leave this decision to the installer on the day. Decide how you want your home battery and EV charger to interact, then choose the hardware and wiring approach accordingly.
Be warned: some solar and battery installers may struggle with hardwiring the EV charger to be invisible to the battery if they haven’t done it before. Most non-solar sparkies will be left scratching their heads at your request.
Mistake #12: Letting The Wrong Person Move Your CT Coils
Be careful with anyone working around your solar switchboard. Utility meter technicians may not fully understand solar switchboards, and they can easily create problems by misplacing CT coils.
If your solar, battery or EV charger relies on CT coils to measure current flow, those CTs need to be in the right place and facing the right way. Move them carelessly, and the system can make bad decisions based on bad data.
Mistake #13: Making The Charger Hard To Isolate Or Reset
Technically, an EV charger doesn’t need an isolator switch.
The mistake is treating that as the end of the conversation. Many installers still fit a local switch or socket outlet for serviceability and easy reset.
Ask your installer what they recommend for your charger and location. A local isolator can make life easier if the charger needs servicing, troubleshooting or a hard reset. It can also have a lock installed if you want to secure the charger.
Mistake #14: Undersizing The Charging Circuit
Some electricians assume a 6 mm² cable and 32 amp circuit breaker are enough for a 7 kW charger.
EV charging shouldn’t be treated like a normal appliance load. EV charging means hour after hour of full-rated consumption. That creates heat, and heat is what marginal cable sizing does not like.
In all but the most basic installations, 6 mm² cable on a 32 amp breaker can be marginal. Normal circuit design means you want about 20% headroom to prevent nuisance tripping. A 6 mm² cable can also struggle with heat dissipation if there’s bulk insulation around it or it’s routed through a roof space.
Increasing EV charging cables from 6 mm² to 16 mm² will cost a little more upfront, but doing it right is cheaper than doing it twice.
Manufacturers specify EV charging circuits require 40 amp-rated circuits. That means your electrician will design for 10 mm² cable in almost every situation. You also need enough room in the switchboard for heat to dissipate.
Some electrical manufacturers specify that EV charging circuits should be rated at twice the nominal load if the switchboard is crowded and likely to become heat-soaked.
Don’t let your installer size the circuit on the bare minimum. EV charger circuits need to be designed for sustained heavy load.
Mistake #15: Not Future-Proofing Expensive Cable Runs
EV charger installations can get expensive when the charger is a long way from the switchboard, or when the cable needs to be trenched to a driveway, garage or carport.
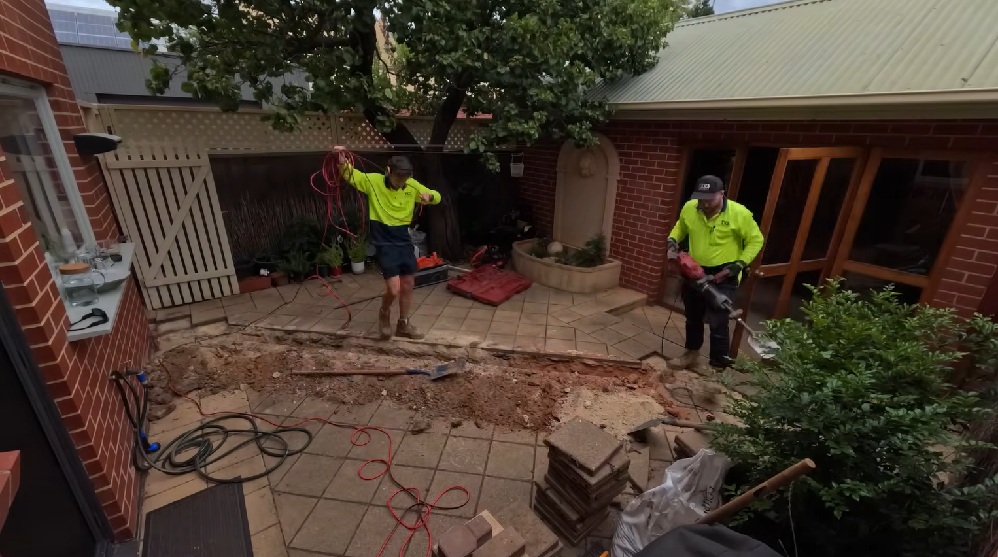
Pay once, cry once: digging a trench for the EV charger’s supply cable made this install more expensive, but it delivered a cleaner cable route and the chance to future-proof the job with spare conduit.
The mistake is doing the expensive work once, but not future-proofing it.
If you are trenching or running long expensive cables, add spare data cables or a spare conduit for future upgrades. It’s much cheaper to do this while the job is already open than to pay someone to come back later and do it all again.
For a detailed look at just how tricky and expensive some EV charger installations can get, check out this real-world example from Adelaide:
Mistake #16: Ignoring Your Grid Connection Limits
Fuelling an EV demands bulk energy. There’s no diversity in the load. It’s hour upon hour of full-rated consumption, which can be a significant extra demand on your grid connection.
For example, a single-phase grid connection could only run two EV chargers and nothing else. If you want more charging capacity, you may need to upgrade the mains supply to the building. This could be changing the service cable to increase the current available (ie 40 to 63amps), an upgrade to 3-phase, or overhaul the switchboard at the same time.
Don’t find this out after the charger is on the wall. Ask your installer whether your mains supply, service fuse and switchboard can handle the charger you want, especially if you expect to add another EV later.
EV Charger Quotes
If you want to be confident that your EV charger is installed by a quality installer, you can request up to 3 quotes from EV charger installers that we have thoroughly vetted: