Solar 101, Part 1: Understanding Solar
By Finn Peacock – Chartered Electrical Engineer, Ex-CSIRO, Founder of SolarQuotes.com.au
Last Updated: 21st Jul 2025
Thinking about going solar, and feel overwhelmed?
Don’t stress!
I’ve developed this three-part ‘Solar 101’ beginners guide to get you up to speed ASAP:
- Part 1 – Understanding Solar – the page you are reading – goes through the basic principles of residential solar energy.
- Part 2 – Buying Solar – covers the things you should know when comparing solar quotes and preparing to buy a system.
- Part 3 – Owning Solar – explains what to do after buying solar to get the most from your system. It also goes through what you should do to prepare for electric cars and home batteries.
If understanding solar power is not a priority, skip directly to part 2 of my guide for practical advice on buying solar.
But, if you recognise that understanding the basics of solar will give you an edge when buying a system, read on – or watch this video.
- How do solar panels work?
- Anatomy of a solar electricity system
- The difference between power (kW) and energy (kWh)
- How much energy will a solar system produce?
- How solar saves you money
- Batteries and solar
1) How do solar panels work?
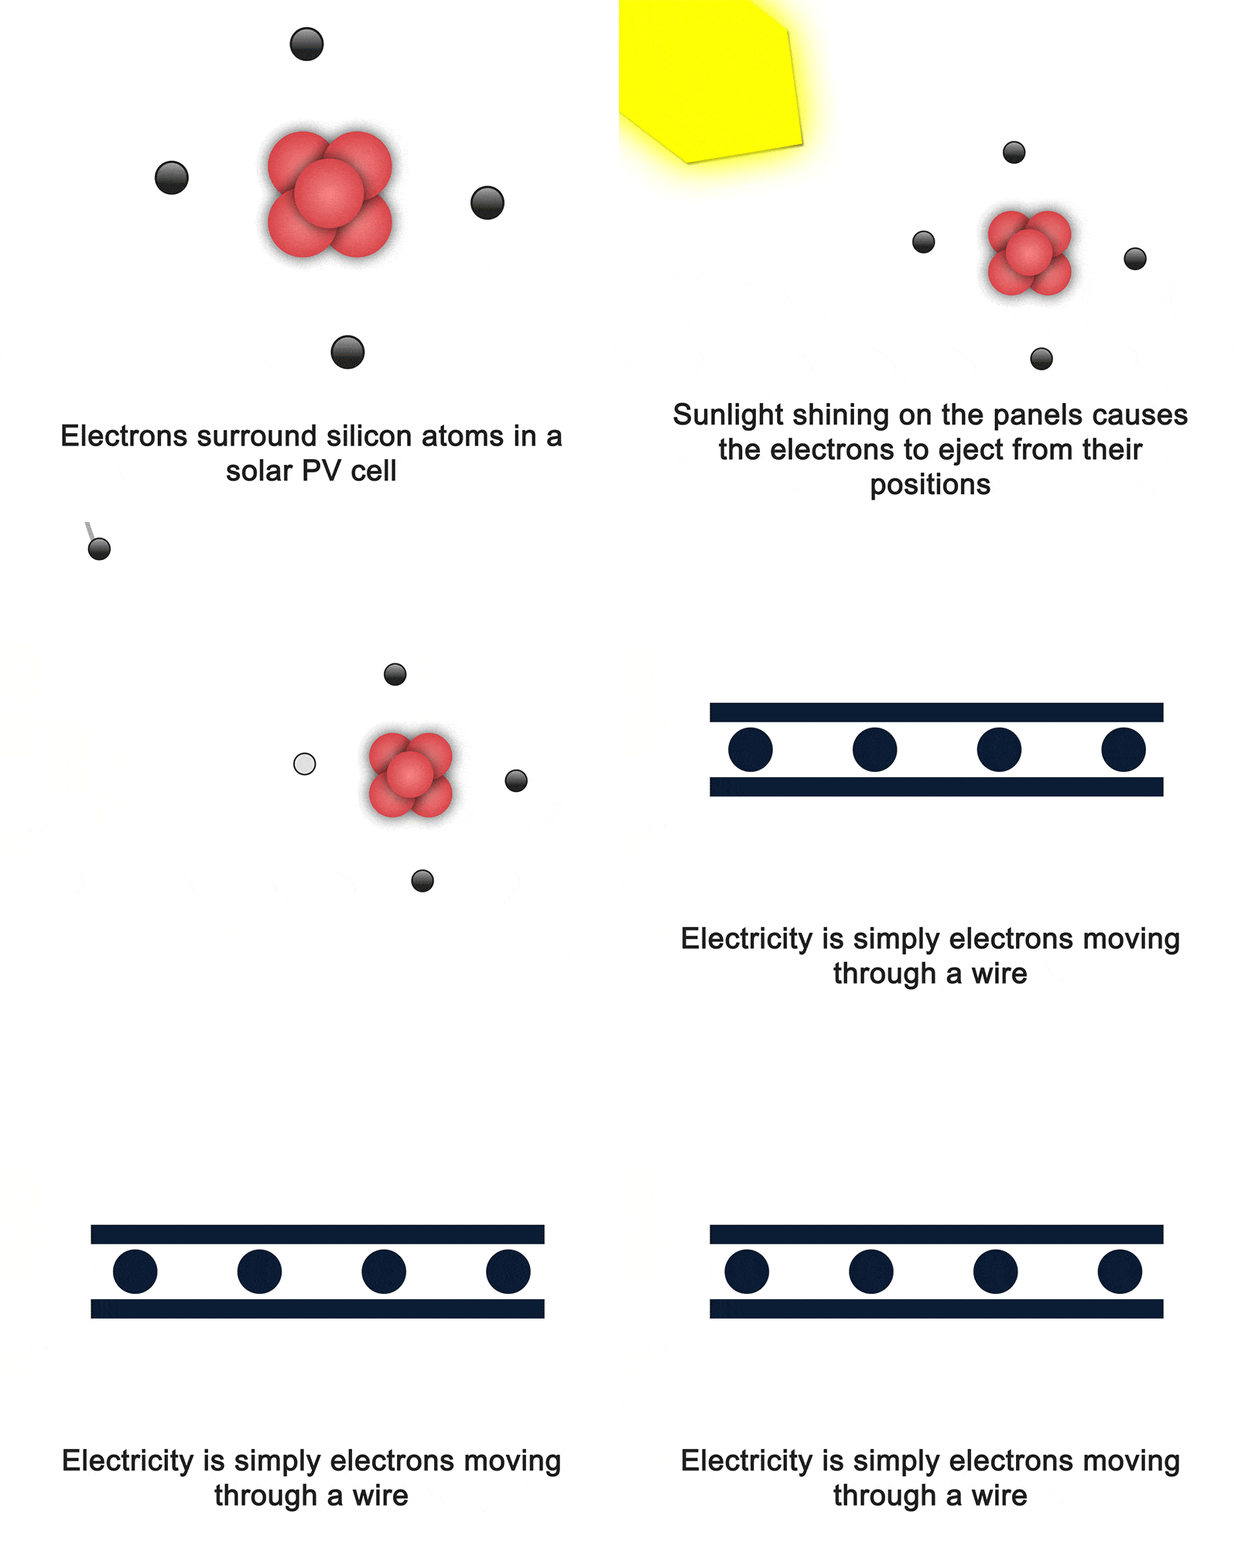
Electricity is simply electrons flowing in a circuit. But how does sunshine make electrons flow?
This short animation shows how sunlight generates electricity inside a solar cell:
Nerds like me know this phenomenon as the “PV (photovoltaic) effect”.
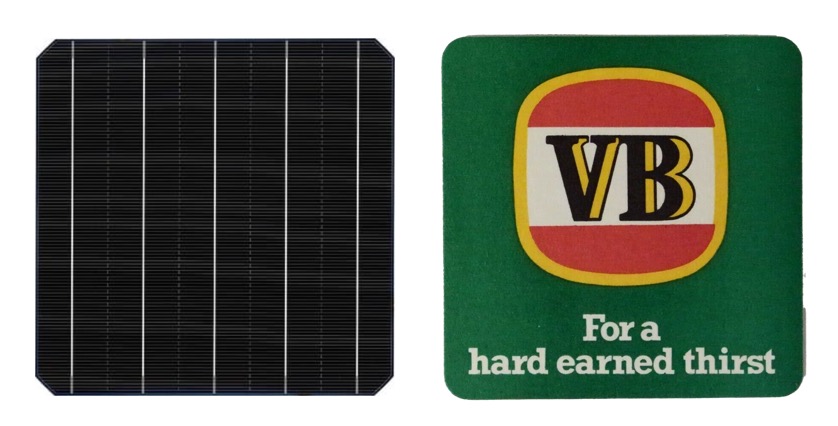
A solar cell is a black or blue coaster-sized silicon wafer:
Nerd Fact: The faint horizontal lines are metal ‘fingers’ that collect moving electrons. They then deliver them to the thicker, vertical metal lines called ‘busbars’. The busbars collect all the electrons and connect to the next solar cell.
Beer Nerd Fact: VB is only drinkable if it’s *really* cold.
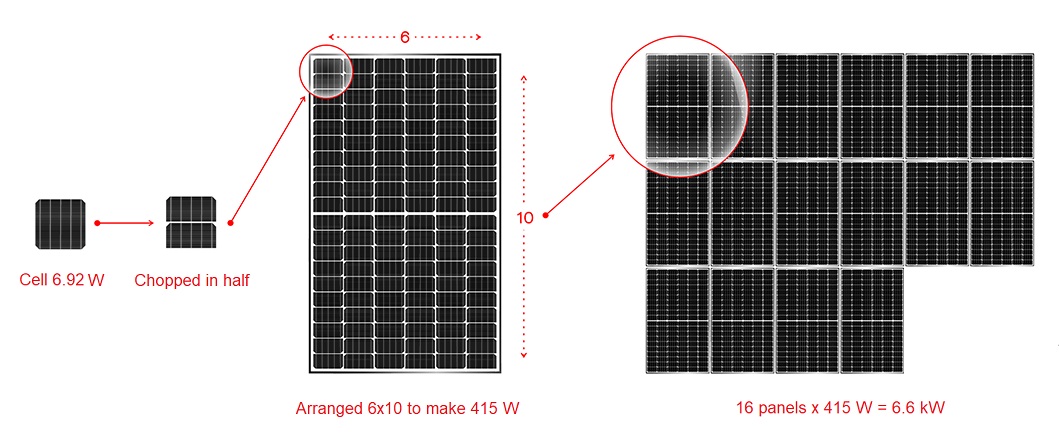
A few years ago, residential solar panels had around 60 cells of roughly 6 Watts each, arranged in a 6 by 10 matrix. Each cell produced about 0.6 volts and 10 amps in full sun.
Nerd Fact: The cells are electrically connected in series. If one cell becomes shaded, it restricts the current in every cell. This is why one bird poo can reduce output by much more than its size would suggest.
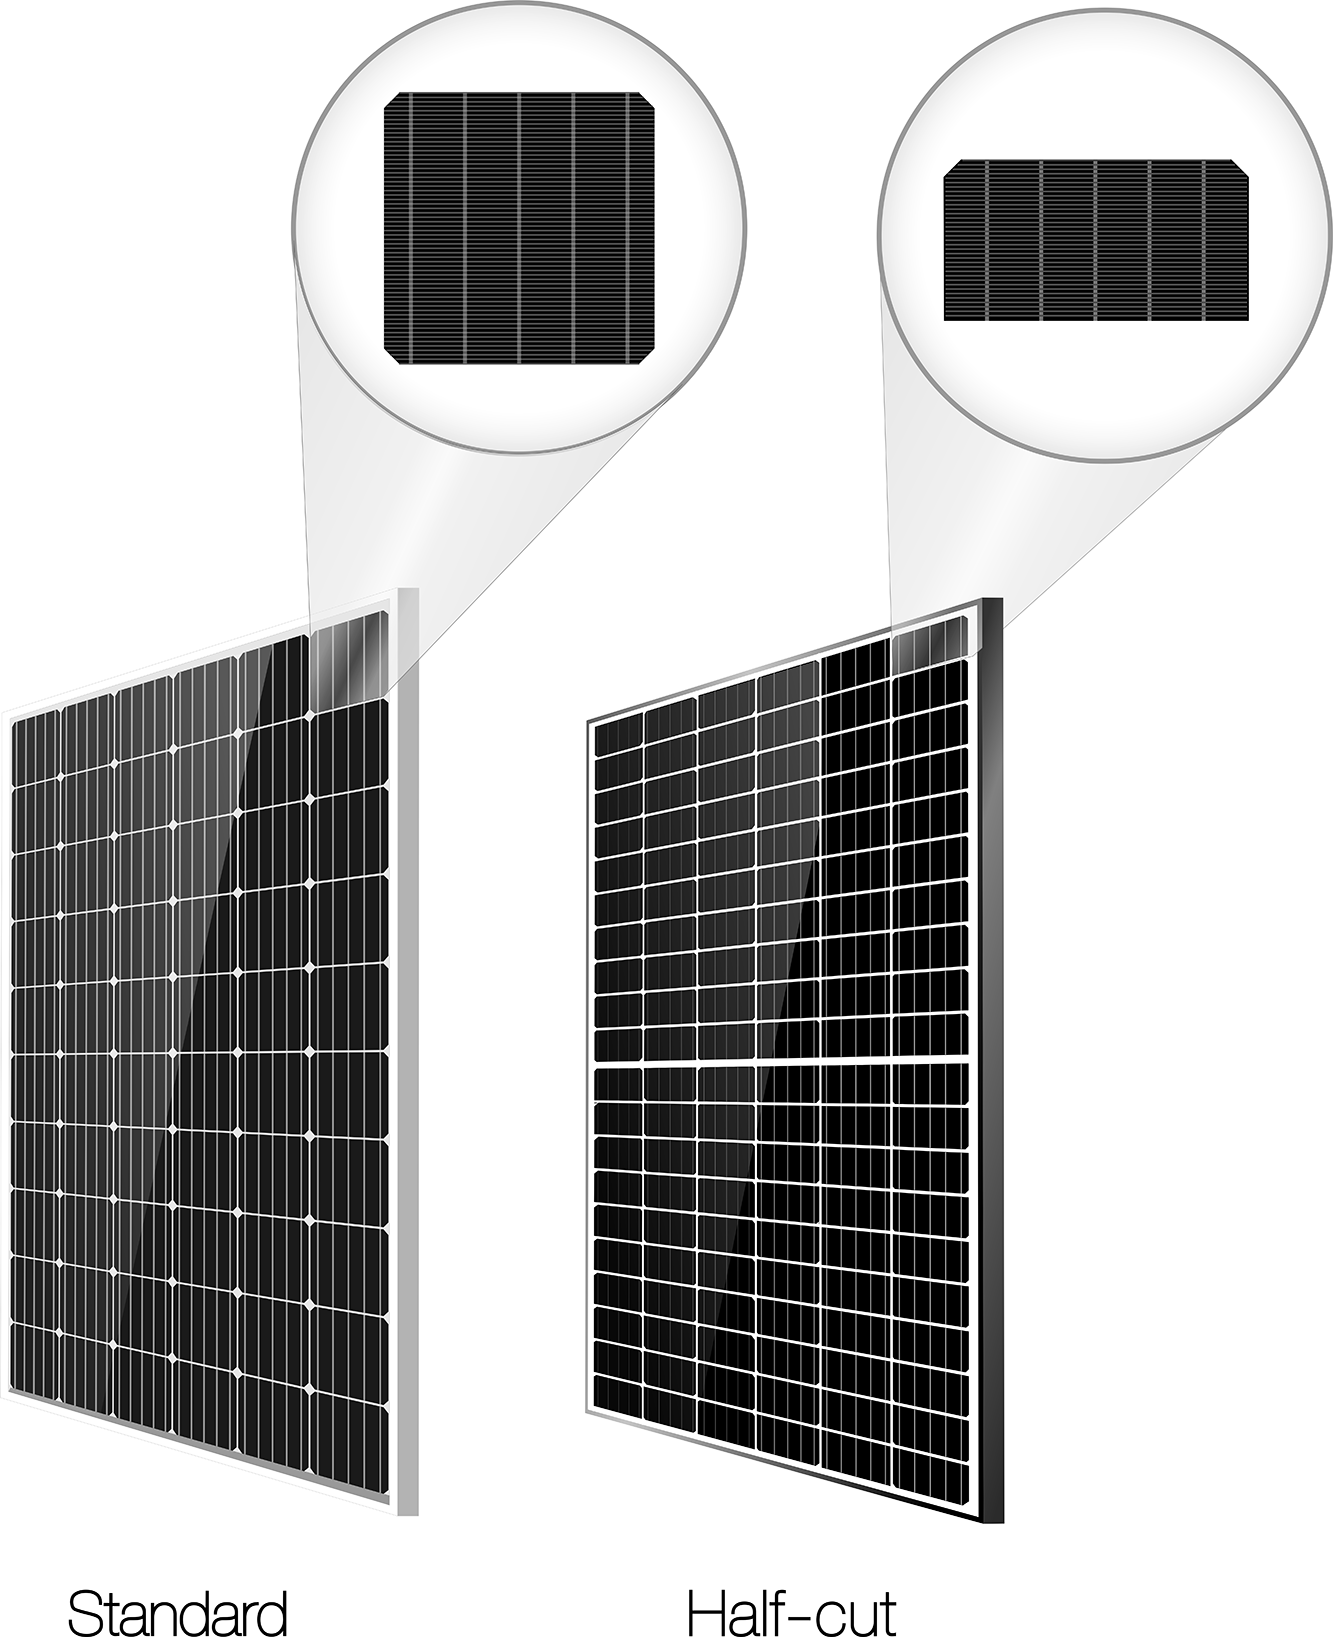
These days, nearly all panels come in a “half cut” configuration (where the cells are, obviously, cut in half). Compare a “standard” panel with a half-cut one:
The peak power of commonly installed panels these days is 120 half cells x 3.46 watts = 415 Watts.
If you connect 18 of these panels together, you have enough for a 6.6 kilowatt solar system (16 x 415W = 6,600 W = 6.6 kilowatts).
Nerd Fact: While 6.6kW is a commonly installed size, the average capacity of new residential solar systems is now over 10kW.
But – you need more than solar panels for a functioning system!
2) Anatomy of a solar power system
Here are the core components of a solar power system:
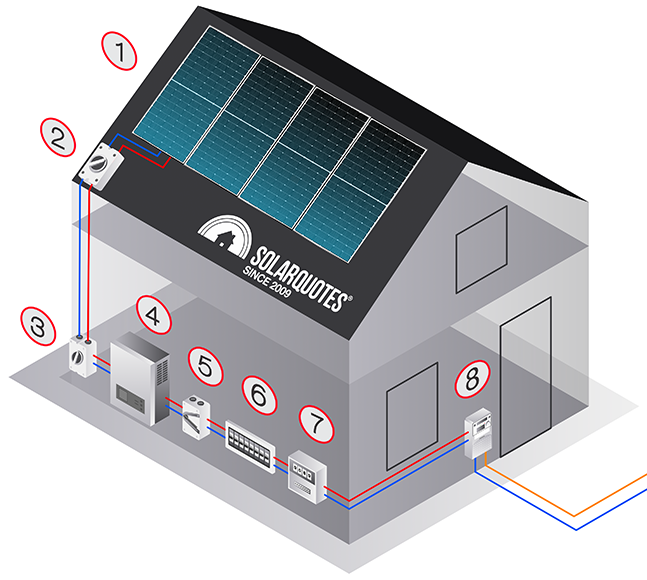
Let’s go through them all:
1️⃣ Solar Photovoltaic (PV) Panels
Solar panels absorb sunlight and generate Direct Current (DC) electricity. They do this by using the ‘PV effect’ described above.
2️⃣ Rooftop DC Isolator
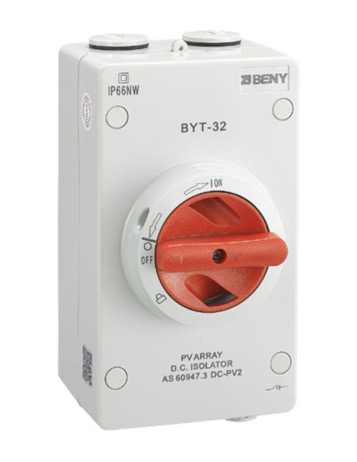
It is a stupid device, unique to Australia.
The idea of the switch is that firefighters can isolate the solar array from the roof. Ironically, rooftop DC isolators have caused more solar panel fires than anything else. This is because they get hammered by the elements on the roof, and if water gets in – bad things are gonna happen.
But rooftop DC isolators are not strictly required to be installed under a new standard (AS/NZS 5033:2021) that went into effect Australia-wide from 19 May 2022 – but came into effect in November 2021 in NSW.
However, where a rooftop DC isolator is not installed, a “disconnection point” is required, and that involves other associated requirements relating to cable routing, documentation and labelling.
A good installer will mount your rooftop DC isolator in such a way that it will stay watertight. Unfortunately, not all installers are good. On a cheap, rushed installation, the rooftop isolators are often the weakest link.
If you want to go without one, a cheap installer may be unwilling to do the extra work required under the revised standard.
3️⃣ Inverter DC Isolator
This is a switch that can disconnect the panels from the inverter – but is at ground level, next to the inverter. It is useful if an electrician needs to work on the inverter or de-energise the system for any other reason.
Good, modern inverters now come with a built-in DC isolator, which is a lot neater and presents less risk of bad connections or water ingress.
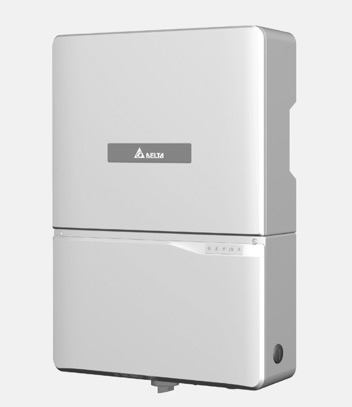
4️⃣ Solar Inverter
This device takes the ‘raw’ DC electricity from the panels and spits out 230V AC electricity; the form that your home can use.
5️⃣ AC Isolator
This switch can disconnect the 230V AC from the inverter, de-energising and isolating the inverter from the mains. If you need to switch off your solar system, you should always turn off the AC isolator first.
Nerd Fact: If your inverter is within 3 metres of your switchboard, you don’t need an AC isolator. This is because you can isolate the inverter through its switchboard circuit breaker.
6️⃣ Switchboard
The switchboard contains the breakers for every circuit in the house. It is where the grid, and your solar inverter, connects into your home.
Your installer will need to add a circuit breaker for the inverter here. Ideally, they’ll add a ‘consumption monitor’ as well.
If your switchboard is small, or old, installing a solar power system may also require a new switchboard. This adds approximately $1200 in costs, but can be considerably more depending on the work required.
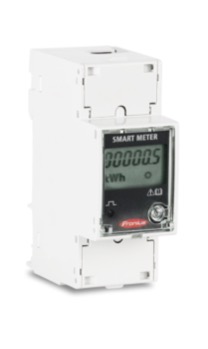
7️⃣ Consumption monitor (optional, but highly recommended)
Solar inverters, out of the box, only have “production monitoring”. This shows you how much electricity your system has generated on a given day.
A consumption monitor is a small box of electronics that goes in your switchboard. It gives you – wait for it – full ‘consumption monitoring’.
This means you’ll be able to see not only what your solar system has generated, but what your home has used as well.
Trust me – you want one of these so you can understand how well your system is working. It also makes it easy to maximise your savings from solar energy by making you aware of your electricity use habits.
8️⃣ Grid meter
Your energy retailer (AGL, Origin, etc) installs this after you get solar installed. It tells them how much grid electricity your home imports and how much solar energy you export, so they can bill you – and credit you in the case of exports.
Most electricity retailers will give you a login to see this data every half-hour or so. But it is not a replacement for the consumption monitor described above. This is because it can’t talk to your solar inverter, meaning it doesn’t know how much solar energy is being used by your home – only how much surplus is going to the grid.
On a solar home, this meter is only useful to the electricity retailer.
Most solar installations require a meter replacement/upgrade. The exception is if your meter is new (or replaced recently). Your electricity retailer handles your meter replacement if you install solar panels.
3) The difference between power (kW) and energy (kWh)
One of the fundamental things you need to understand when discussing solar is the difference between power and energy.
It amazes me how often people in the industry (who should know better) mix these two up. But it’s not surprising – many others don’t realise that power and energy are two different things.
Power (kW)
If you think of electrical current as electrons in a wire, its power is how fast those electrons are flowing. Power is how fast electricity is being generated (or consumed).
The size of a solar system equals its ‘peak power’ output in kW.
For example, a 6.6 kW solar system might consist of sixteen 415W solar panels on the roof. This array can push electricity out at a maximum rate of 6.6 kW (6,600 watts).
Nerd Fact: Power’s fundamental units are Joules per second.
Energy (kWh)
The abbreviation kWh stands for kilowatt-hour. A kWh is a measure of energy (not power).
Energy is how much electricity is generated, stored, or consumed over time.
For example,
- ‘My solar power system produced 36 kWh of electricity today!’
- ‘My heater consumed 4 kWh of electricity today’
- ‘This battery stores 13 kWh of energy’.
If your solar panels (for example) generate 5 kW for a whole hour, you will have produced 5 kWh of energy. That energy could be used by your appliances, exported to the grid or stored in a battery.
I’ve put together a simple animation to demonstrate this concept:
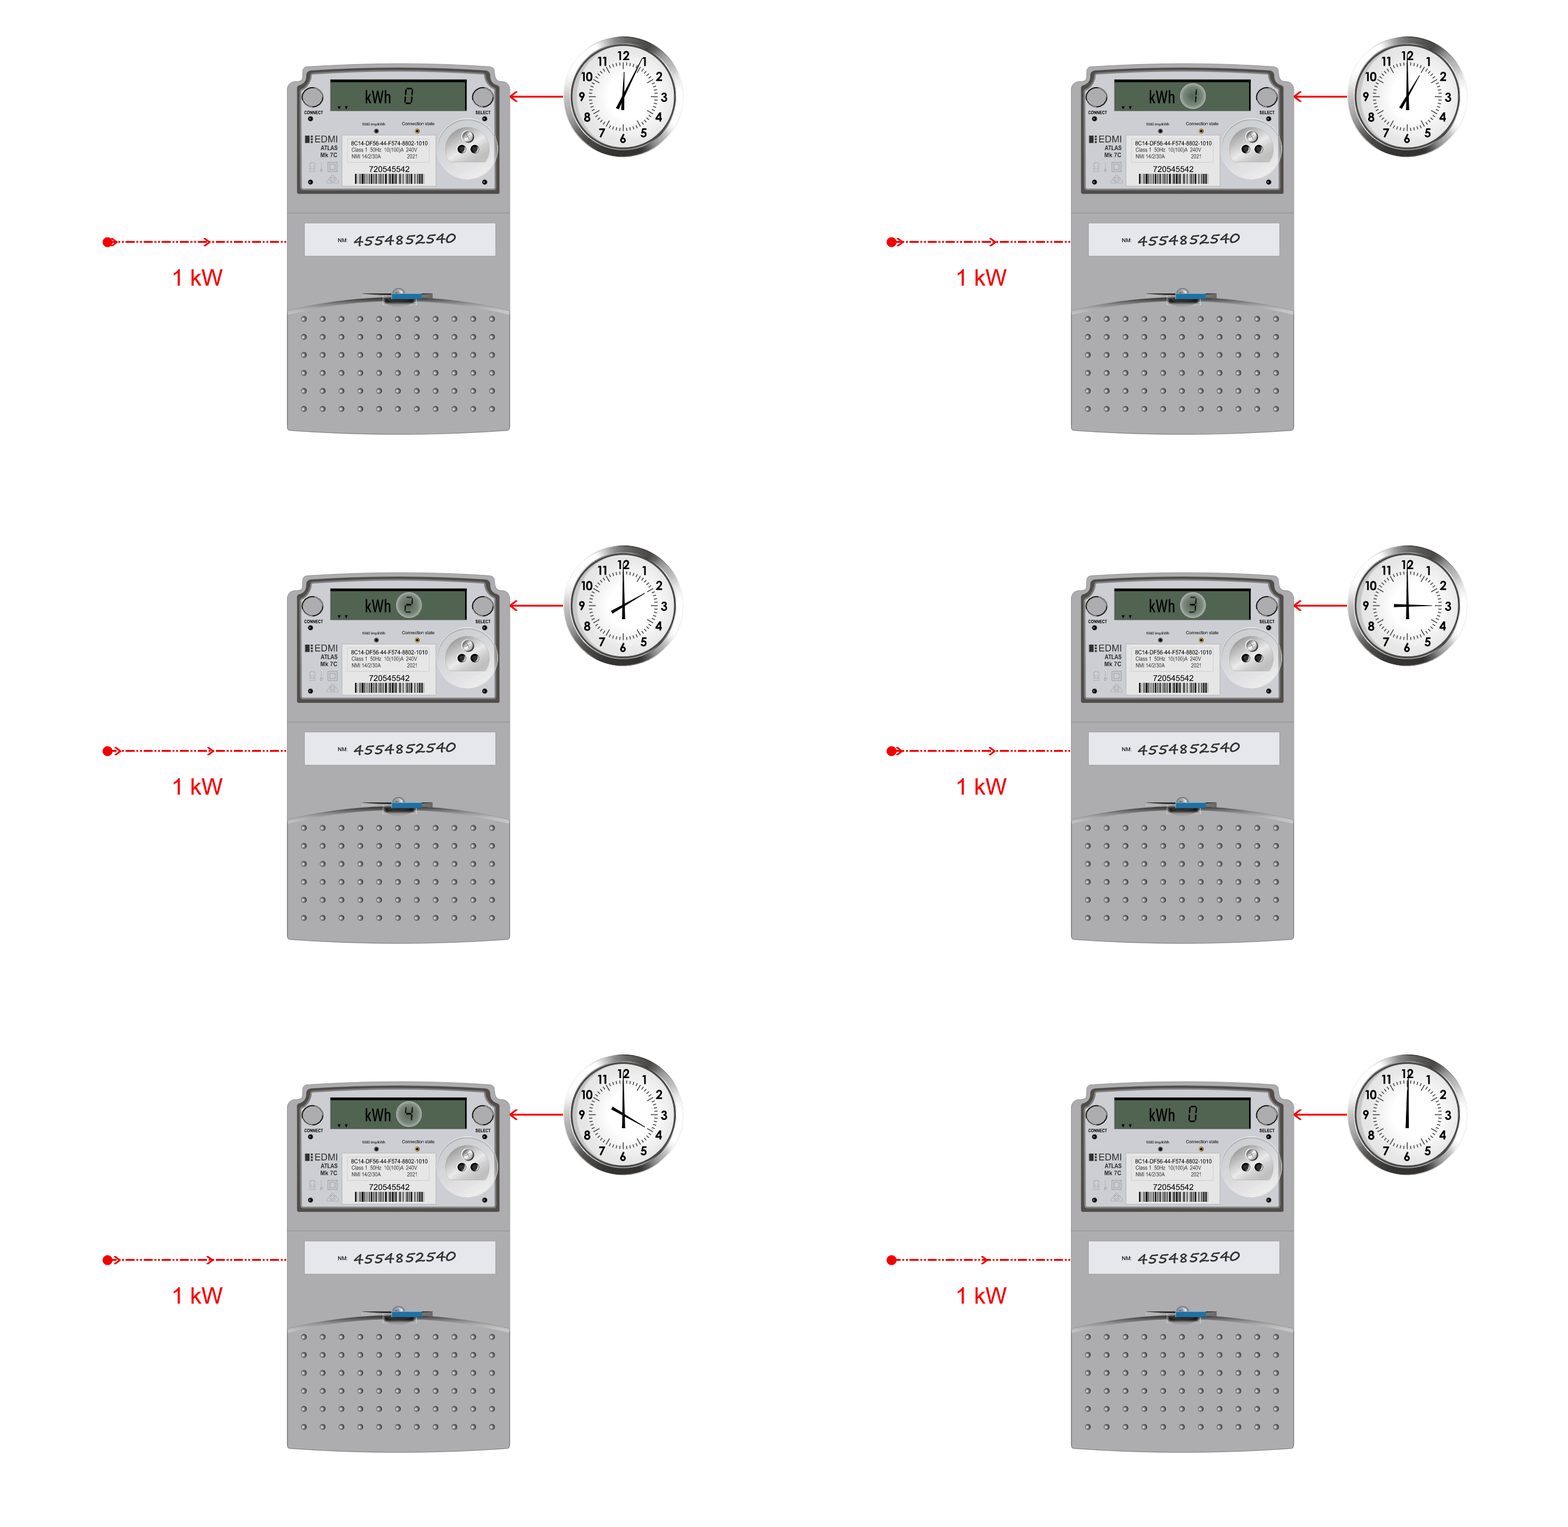
This meter has 1 kW of power constantly moving through it from the grid. Every hour it records 1 kWh of energy consumed.
How much power does a 6.6 kW system produce?
Not 6.6 kW!
Eh?
There are two main reasons why:
1) 6.6 kW solar systems almost always use a 5 kW inverter. This means you’ll never get more than 5 kW out of the system at any point in time.
2) You’ll only produce your peak power around midday on a ‘perfect’ solar day, which is a day that is sunny but isn’t too hot as hot panels are less efficient.
Here’s an example taken from a friend’s SolarEdge monitoring app, showing the production on an almost perfect solar day from 6.6 kW of panels and a 5 kW inverter:
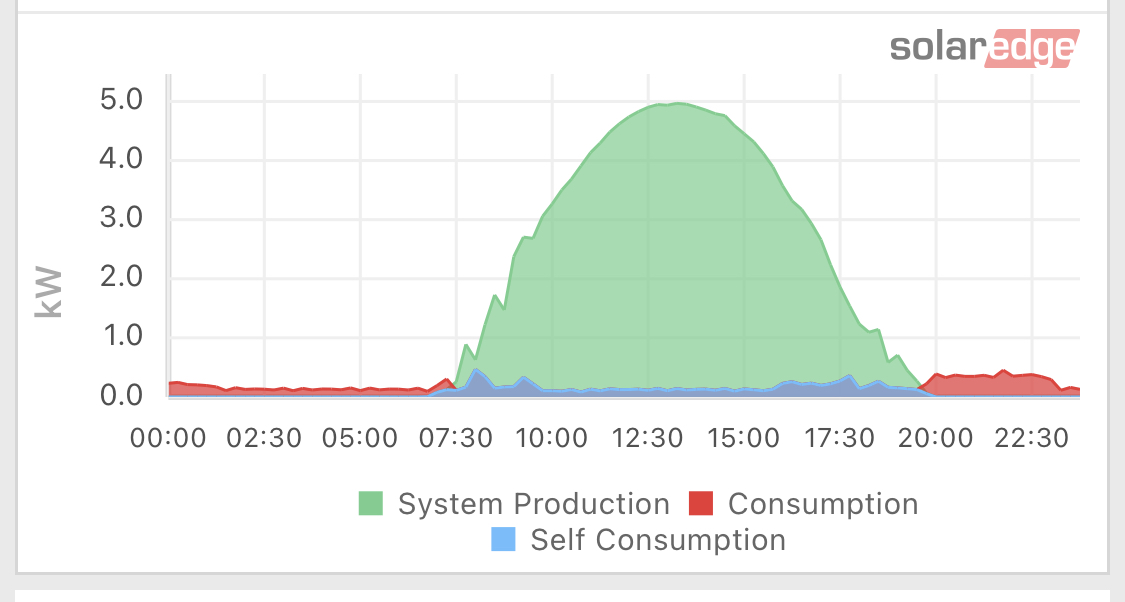
The daily generation of a 5 kW inverter with 6.6 kW of panels
You can see the inverter only hits its peak 5 kW output right around midday.
Even if this system had a 6.6 kW inverter to match the panels’ capacity, the peak of the curve would probably never hit 6.6 kW. It would probably top out at about 5.3 kW on a perfect day due to:
- Dirt/dust on the panels
- Heat reducing solar panel output
- Wiring losses
- Inverter efficiency losses
The combination of all of these means that the typical solar system’s peak power will only be around 80% of the nameplate panel capacity.
So don’t stress if your system isn’t always hitting its theoretical max output – it’s totally normal.
4) How much energy will a solar power system produce?
Short answer: The average amount of energy produced by a 6.6 kW system in Australia in one day is about 26 kWh. More in summer, less in winter.
Longer answer: To guesstimate the amount of energy produced by a solar power system on an average day in Australia, multiply the peak power of the system (aka the system size) by the magic number:
So, a 5kW system will produce:
5 x 4 = about 20 kWh on an average day.
A 10 kW system – 10 x 4 = 40 kWh.
This magic number is higher in sunnier spots like Perth and lower in cloudier places such as Hobart:
- Adelaide: 4.1 kWh
- Alice Springs: 5 kWh
- Brisbane: 4.3 kWh
- Cairns: 4.3 kWh
- Canberra: 4.1 kWh
- Darwin: 4.6 kWh
- Hobart: 3.2 kWh
- Melbourne: 3.7 kWh
- Perth: 4.6 kWh
- Sydney: 4 kWh
Remember, you’ll get less on a winter’s day, more on a summer’s day. The difference will depend on how pronounced the seasons are where you live. Also, these figures are for north facing solar. If most of the panels face east or west you can expect to generate around 15% less and south facing panels will generate around 30% less.
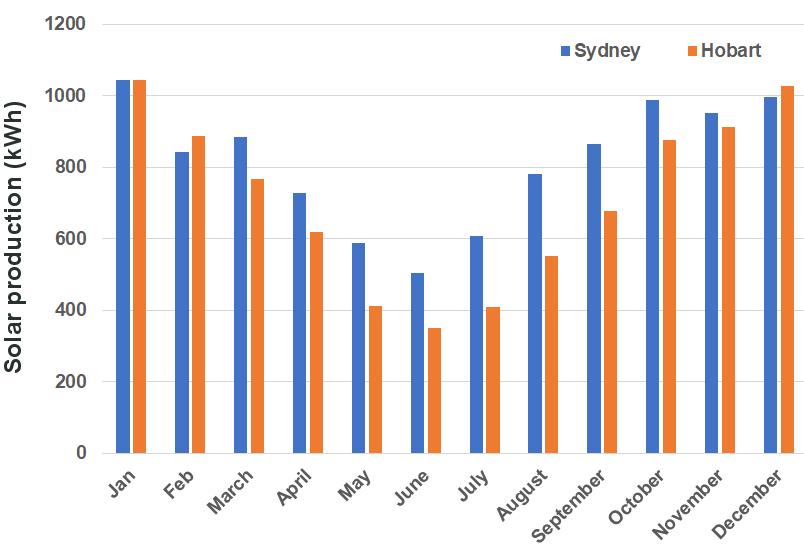
Compare the summer and winter outputs of Sydney versus Hobart:
Nerd Fact: Counter-intuitively, systems in Hobart generate more than ones in Sydney during December and February – mostly due to longer summer days, but also due to lower temperatures.
5) How solar saves you money
Solar saves you money in 2 ways:
1) Self Consumption: When your home is using solar energy instead of the grid, you save the cost of buying that electricity.
2) Feed-In Tariff: When you generate more energy than your home can use, you export the excess to the grid. Your energy retailer pays you a ‘feed-in tariff’ for this.
So self consumption + feed-in tariff = solar savings
Important note: Your self-consumption is invisible on your electricity bill. This is because your electricity retailer can’t see what your solar system offset.
This leads to an all-too-common situation where someone will email me:
“Hey Finn, I just got my first post-solar bill, and it’s showing that the system only saved me $150! What a rip!”
This person is confused because the only solar line item on their bill is the feed-in tariff credit of $150.
There is no line item explaining that, for example, their system saved them an additional $250 that quarter because it reduced their grid usage.
Consumption monitoring, mentioned above, provides this ‘invisible’ piece of the puzzle. This is why I recommend it – so you can figure out your ‘true’ savings from solar power.
6) Batteries and solar
A big enough solar system is capable of giving most people a tiny, zero or even negative bill. But on its own it has two major shortcomings:
a) It doesn’t provide energy at night.
b) If the grid goes down, your system switches off as a safety measure.
Batteries solve this by:
a) Storing excess solar for use overnight.
b) Backing up circuits in your home in the event of a blackout.
Nerd Fact: Some batteries don’t provide backup at all. The gold standard is “apocalypse proof” backup, where solar will charge your batteries even in a blackout.
These features are nice to have – but batteries cost money, and a lot of it. Will they save you money?
I write about this more in part 2 of my solar 101 guide. Unless your home has above average overnight electricity consumption, at this time, you are unlikely to save money by installing a battery. This is usually true even if you can get an incentive such as the NSW battery rebate. But as batteries are improving in quality and coming down in price, this could soon change. Even if a battery is unlikely to save money, you may still consider one worthwhile thanks to the backup power it can provide.
Some people have asked me if “Virtual Power Plants”, or VPPs, are the answer to battery affordability. Because the returns tend to be small and joining one increases the wear and tear on your battery, I’m yet to be convinced that the savings promised by VPP operators make them ‘worth it’, but it could still be enough to put you over the line on the decision to get a battery.
But don’t worry if batteries aren’t a good investment for you yet. Once they become worthwhile, you can easily retrofit batteries to any existing solar system.
Next up – everything you need to know about buying solar
Whew! You made it through part 1 of my 3 part ‘solar 101’ guide.
Next up is part 2 – covering everything you need to know when seeking and comparing quotes for solar – read on!
If you have any questions after reading this – feel free to reach out to me directly at [email protected]
